| Number | Description |
|---|---|
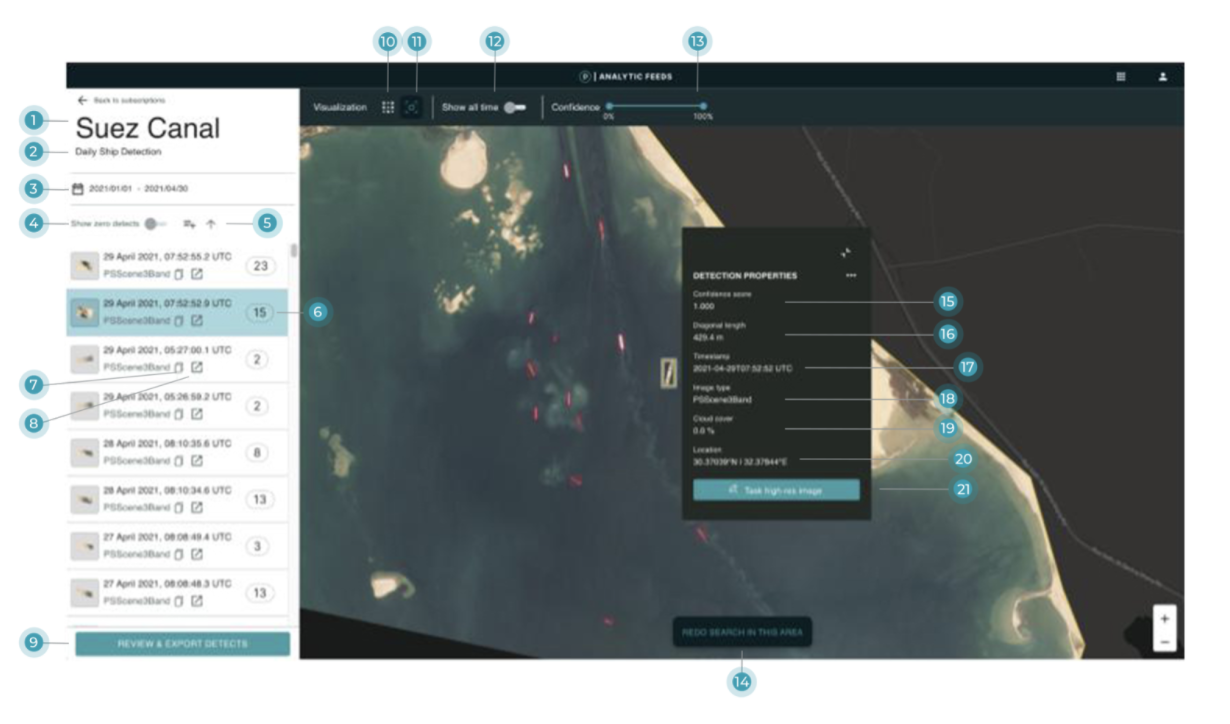
| 1 | Title of the Subscription. Generated manually by the Planet Account Manager. |
| 2 | Description of the Subscription. Each Subscription generates a description that is designed to give additional information about what the Subscription is for. |
| 3 | Date Filter. Choose the dates you wish to see. The dates you select must be within the Subscription start and end dates. |
| 4 | Toggle for Scenes without Detections. Use this toggle to include scenes within the subscription that resulted in 0 detections |
| 5 | Results Sorting. Use this toggle to determine the order in which you wish to view results. Sort by date or number of detections. |
| 6 | Number of Detections within the Image. The number of detections found within the image. |
| 7 | Link to Explorer. Click this link to view imagery within the same AOI or that you have access to in Planet Explorer |
| 8 | Scene ID. This is the unique ID for the scene that was processed for the detection. |
| 9 | Review & Export. Enables you to cycle through detections to quickly remove false positives and export a clean dataset. Note: Detections can take over a minute to load depending on how many there are. |
| 10 | Visualization Option: Heatmap. Choose to see a heatmap of detections. |
| 11 | Visualization Option: Individual Detections. Choose to see individual detections. |
| 12 | Show all Time. This will toggle whether you see only detections for the selected time period or all time periods shown. |
| 13 | Confidence Score Filter. Use the confidence score filtering feature to show bounding box detections with higher confidence and remove false positives with lower confidence scores. |
| 14 | Redo Search In This Area. Our viewer is able to visualize bounding boxes over Basemaps, however when looking in very large areas, it can take an exceedingly long time for them to load. Zooming into areas less than 5,000 km2 and redoing the search has shown a better experience. |
| 15 | Confidence Score. A score (0 - 1.0) of how likely it is that this detection is a true positive (correct) detection. |
| 16 | Detection Diagonal Length. The measurement in m of the diagonal length of the bounding box detection. This can be a good proxy for object length. |
| 17 | Image Acquisition Timestamp. The time at which the image was captured - this reflects the time that the object detected was present. |
| 18 | Image Item Type. The item type of the source imagery used to derive the detection per Planet’s imagery specifications. |
| 19 | Cloud Cover Percentage. The percent of the imagery captured that were covered by clouds per our UDM product. |
| 20 | Location. The Latitude and Longitude of the centroid of the detection. |
| 21 | Link to Tasking Dashboard. Task a skysat to capture a high resolution image of the area. Note: You must already have access to the Tasking Dashboard. |
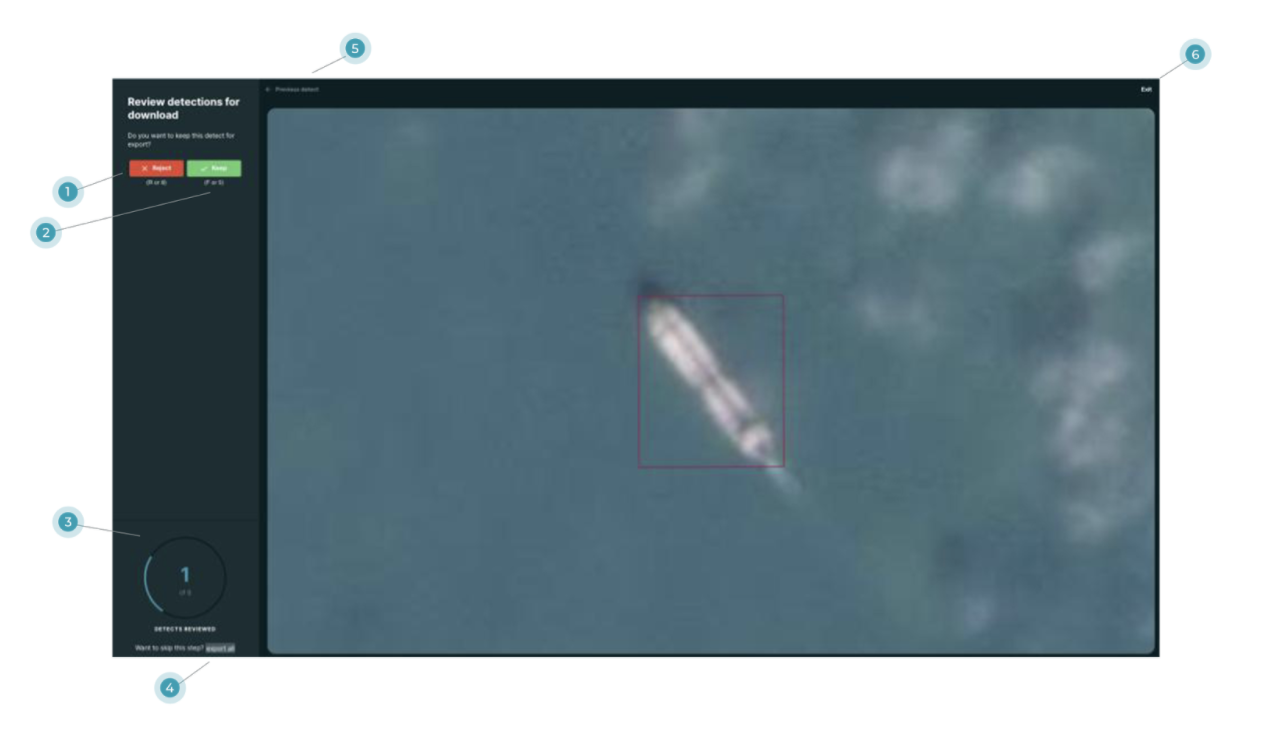
Through the Review & Export flow, you’ll be able to quickly cycle through the detections shown on-screen, removing false positives along the way to ultimately export a clean dataset.
Note: Your progress will not be saved once you leave the review flow. You’ll need to review all detections or export the entire dataset.
| Number | Description |
|---|---|
| 1 | Reject Detection. (Keyboard shortcut “R” or “8”) Rejected detections will not be included in the exported dataset at the end of the Review & Export flow. |
| 2 | Keep Detection. (Keyboard shortcut “F” or “5”) Kept detections will be included in the exported dataset at the end of the Review & Export flow. |
| 3 | Progress Bar. You’ll see how many detections you’ve reviewed and how many more there are to go. |
| 4 | Export All. You can bypass the review flow and export all detections. |
| 5 | Previous Detect. Go back to the previous detection. |
| 6 | Exit. Return to the main Feed Viewer display. |
We are continually working to improve our technical documentation and support. Please help by sharing your experience with us.