By: Kevin Lacaille on February 23 2023
Directly Integrating Planet Data Delivery with Google Earth Engine
Do you need some time and space?
With Planet’s high resolution, multi-band, daily imagery, with large color depth, users have a lot of data! Do you find your computer always reminding you that you need to “make more space available?” Are you always running late because your data processing is taking too long? Please let me present:
 |
 |
Google Earth Engine, or GEE for short, is a cloud-based platform for geospatial analysis and remote sensing applications. It is part of Google’s larger Earth platform, which includes the popular Google Earth mapping software. GEE gives users the opportunity to store their Planet data on Google’s cloud storage and harness Google’s computing infrastructure. GEE is used to analyze and monitor the Earth’s changing environment. It can be used to measure land cover and vegetation health, track changes in surface water, monitor wildfires, and measure other impacts of climate change. It can also be used to generate maps, 3D models, and other visualizations. GEE has become a popular platform for geospatial analysis and remote sensing applications, and has been used for a range of projects, from monitoring crop yields in Canada to tracking deforestation in the Amazon.
Planet 𝗑 Google
Google Earth Engine is used to run large-scale geospatial data analysis or to perform a few simple commands on geospatial data. GEE leverages Google’s tools and services, and performs computations at scale with a user-friendly interface. This sort of geospatial working environment makes analyzing your Planet data fast and easy.
Planet users can easily have their data delivered directly to their GEE project thanks to Planet’s Google Earth Engine Delivery Integration - a simpler way for GEE users to incorporate Planet data into their existing workflows and ongoing projects. This integration simplifies the GEE delivery experience by creating a direct connection from Planet's Orders API to GEE, so that you don't have to download then re-upload images or spin up temporary cloud storage when moving imagery to your GEE account.
In this blog post we are going to cover:
- How to prepare your Google Earth Engine account for data delivery via Planet’s Orders API
- How to use Planet’s GEE Delivery Integration service on your GEE project
- A basic and advanced example JSON requests and responses
- A Python example using Planet’s Python SDK, hosted in a Jupyter Notebook
- A Planet CLI example
How to deliver your data to GEE
To deliver data to your GEE project, you must first sign up for an Earth Engine account, create a Cloud Project, enable the Earth Engine API, and grant access to a Google service account.
Set up GEE
Before we get into the coding aspect of it all, we need to set up our GEE project.
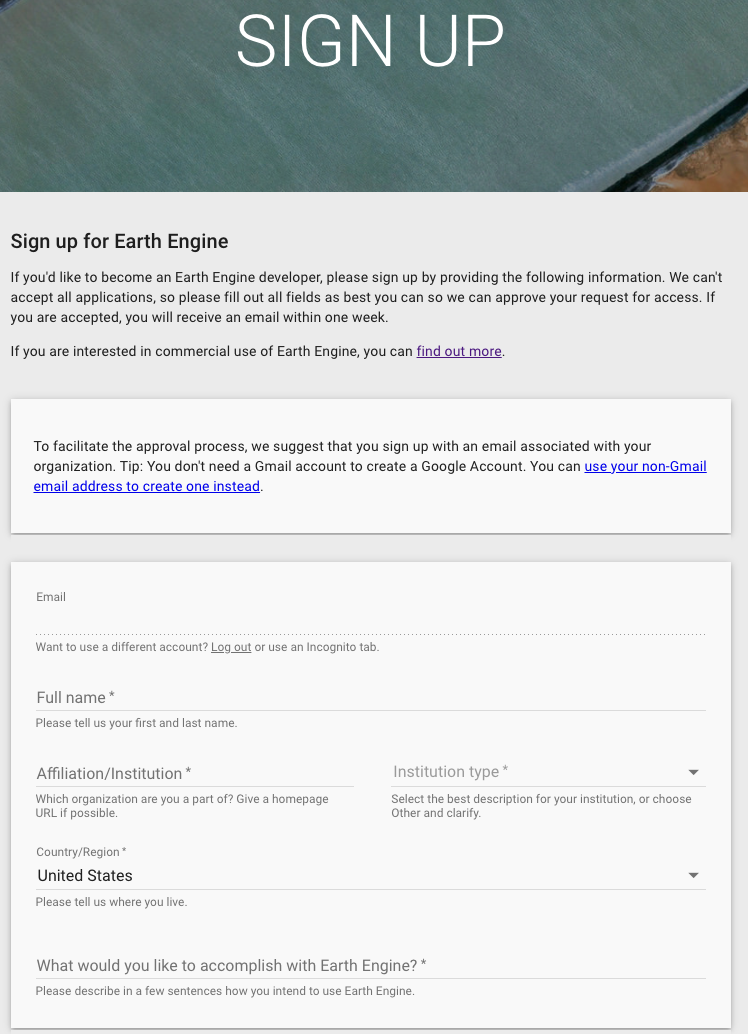
1. Sign up for an EE account
First thing’s first, let’s sign up for an Earth Engine account. Go to: https://signup.earthengine.google.com/
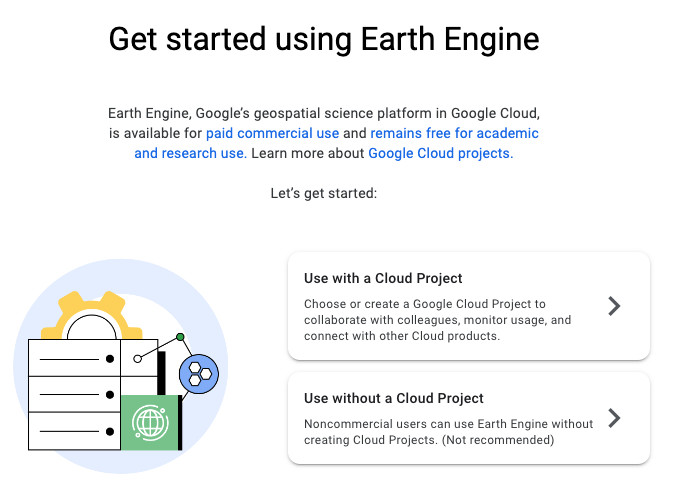
2. Register a Google Cloud Project (GCP) project
Now that you have an Earth Engine account, let’s create a new Cloud Project for your account. This will simultaneously create an empty ImageCollection. This ImageCollection is where all of your data will be delivered to.
Go to: https://code.earthengine.google.com/register/
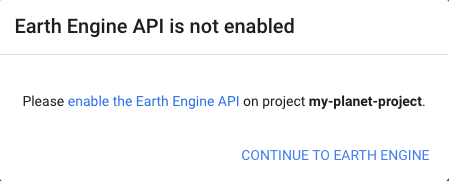
3. Enable the EE API for the project
In order to allow Planet’s Orders API to interact with GEE, we must first enable the Earth Engine API.
Go to: https://console.cloud.google.com/apis/library/earthengine.googleapis.com
4. Grant Planet access to deliver to your GEE project
Lastly, you need to create a service account, which in this case is essentially a virtual account, which will be used to automate our GEE integration. To create this service account, return to the console and select: Navigation menu > IAM & Admin > Service Accounts
Then we can create a service account by clicking “+CREATE SERVICE ACCOUNT”. Here we will add Planet’s Google service account, named planet-gee-uploader@planet-earthengine-staging.iam.gserviceaccount.com
Finally, your service account must be granted the role of “Earth Engine Resource Writer”, which will allow it to deliver your data to your ImageCollection.
Examples
Now that you have a GEE project that Planet has access to, here’s how you tell Planet how to access that GEE project.
To communicate with Planet’s servers, we use RESTful endpoints. Regardless of the language you use to make a network request, here’s the body of the request. In the language that you use, you’ll need to provide the following to successfully make a request:
- API endpoint (https://api.planet.com/compute/ops/orders/v2)
- Basic auth using your Planet API key
- Header to specify that the
Content-Typeisapplication/json - Body, the specifics of what you’re requesting
Basic JSON request
REST method:
POST https://api.planet.com/compute/ops/orders/v2/
An example JSON request body for delivery for:
- Order name: iowa_order
- Item IDs: 20200925_161029_69_2223, 20200925_161027_48_2223
- Item type: PSScene
- Product bundle: analytic_sr_udm2
- GEE project name: planet-devrel-dev
- ImageCollection name: gee-integration-testing
Request:
{
  "name": "iowa_order",
  "products": [
    {
      "item_ids": [
        "20200925_161029_69_2223",
        "20200925_161027_48_2223"
      ],
      "item_type": "PSScene",
      "product_bundle": "analytic_sr_udm2"
    }
  ],
  "delivery": {
    "google_earth_engine": {
      "project": "planet-devrel-dev",
      "collection": "gee-integration-testing"
    }
  }
}
Response:
{
"_links": {
"_self": "https://api.planet.com/compute/ops/orders/v2/1e4ade86-20dd-45bc-a3cf-4e6f378b5774"
},
"created_on": "2022-11-30T19:08:34.193Z",
"error_hints": [],
"id": "1e4ade86-20dd-45bc-a3cf-4e6f378b5774",
"last_message": "Preparing order",
"last_modified": "2022-11-30T19:08:34.193Z",
"metadata": {
"stac": {}
},
"name": "iowa_order",
"products": [
{
"item_ids": [
"20200925_161029_69_2223",
"20200925_161027_48_2223"
],
"item_type": "PSScene",
"product_bundle": "analytic_sr_udm2"
}
],
"state": "queued"
}
Advanced JSON request
GEE integration also supports two tools, clipping, and sensor harmonization. To include them, we add them to the “tools” schema. Adding to the previous example, if we want to clip to an AOI defined as a polygon and harmonize our data to Sentinel-2’s sensor, the JSON request would look like:
Request:
{
  "name": "iowa_order",
  "products": [
    {
      "item_ids": [
        "20200925_161029_69_2223",
        "20200925_161027_48_2223"
      ],
      "item_type": "PSScene",
      "product_bundle": "analytic_sr_udm2"
    }
  ],
  "delivery": {
    "google_earth_engine": {
      "project": "planet-devrel-dev",
      "collection": "gee-integration-testing"
    }
  },
  "tools": [
    {
      "clip": {
        "aoi": {
          "type": "Polygon",
          "coordinates": [
            [
              [-91.198465, 42.893071],
              [-91.121931, 42.893071],
              [-91.121931, 42.946205],
              [-91.198465, 42.946205],
              [-91.198465, 42.893071]
            ]
          ]
        }
      }
    },
    {
      "harmonize": {
        "target_sensor": "Sentinel-2"
      }
    }
  ]
}
Response:
{
"_links": {
"_self": "https://api.planet.com/compute/ops/orders/v2/1e4ade86-20dd-45bc-a3cf-4e6f378b5774"
},
"created_on": "2022-11-30T19:08:34.193Z",
"error_hints": [],
"id": "1e4ade86-20dd-45bc-a3cf-4e6f378b5774",
"last_message": "Preparing order",
"last_modified": "2022-11-30T19:08:34.193Z",
"metadata": {
"stac": {}
},
"name": "iowa_order",
"products": [
{
"item_ids": [
"20200925_161029_69_2223",
"20200925_161027_48_2223"
],
"item_type": "PSScene",
"product_bundle": "analytic_sr_udm2"
}
],
"state": "queued",
"tools": [
{
"clip": {
"aoi": {
"coordinates": [
[
[-91.198465, 42.893071],
[-91.121931, 42.893071],
[-91.121931, 42.946205],
[-91.198465, 42.946205],
[-91.198465, 42.893071]
]
],
"type": "Polygon"
}
}
},
{
"harmonize": {
"target_sensor": "Sentinel-2"
}
}
]
}
Integration with Python
Users can integrate their Planet data delivery with GEE with Python via Planet’s Python SDK 2.0. Using the SDK, users can generate their request, order data using the Orders API, then have it delivered directly to GEE. For an in-depth example, please see this Jupyter Notebook.
import planet
import asyncio

# The area of interest (AOI) defined as a polygon
iowa_aoi = {
    "type":
    "Polygon",
    "coordinates": [[[-91.198465, 42.893071], [-91.121931, 42.893071],
                     [-91.121931, 42.946205], [-91.198465, 42.946205],
                     [-91.198465, 42.893071]]]
}

# The item IDs we wish to order
iowa_images = ['20200925_161029_69_2223', '20200925_161027_48_2223']
# Google Earth Engine configuration
cloud_config = planet.order_request.google_earth_engine(
    project='planet-devrel-dev', collection='gee-integration-testing')
# Order delivery configuration
delivery_config = planet.order_request.delivery(cloud_config=cloud_config)
# Product description for the order request
data_products = [
    planet.order_request.product(item_ids=iowa_images,
                                 product_bundle='analytic_sr_udm2',
                                 item_type='PSScene')
]

# Build the order request
iowa_order = planet.order_request.build_request(name='iowa_order',
                                                products=data_products,
                                                delivery=delivery_config)

# Create a function to create and deliver an order
async def create_and_deliver_order(order_request, client):
    '''Create and deliver an order.

    Parameters:
        order_request: An order request
        client: An Order client object
    '''
    with planet.reporting.StateBar(state='creating') as reporter:
        # Place an order to the Orders API
        order = await client.create_order(order_request)
        reporter.update(state='created', order_id=order['id'])
        # Wait while the order is being completed
        await client.wait(order['id'],
                          callback=reporter.update_state,
                          max_attempts=0)

    # Grab the details of the orders
    order_details = await client.get_order(order_id=order['id'])

    return order_details

# Create a function to run the create_and_deliver_order function
async def main():
    async with planet.Session() as ps:
        # The Orders API client
        client = ps.client('orders')
        # Create the order and deliver it to GEE
        order_details = await create_and_deliver_order(iowa_order, client)
        return order_details

# Deliver data to GEE and return the order’s details
order_details = asyncio.run(main())
Using the Planet CLI
Lastly, we can use the Planet command line interface (CLI) to deliver data to GEE. If we want to clip or harmonize our data, first we need to create a file called tools.json containing the following information:
[
  {
    "clip": {
      "aoi": {
        "type": "Polygon",
        "coordinates": [
          [
            [-91.198465, 42.893071],
            [-91.121931, 42.893071],
            [-91.121931, 42.946205],
            [-91.198465, 42.946205],
            [-91.198465, 42.893071]
          ]
        ]
      }
    }
  },
  {
    "harmonize": {
      "target_sensor": "Sentinel-2"
    }
  }
]
Then, to order and deliver data with the Planet CLI, we query the Orders API with 3 commands:
1. Generate an order request
The request function requires that you give it an item type, product bundle, an order name, and item IDs.
$ planet orders request \
20200925_161029_69_2223,20200925_161027_48_2223 \
--item-type psscene \
--bundle analytic_sr_udm2 \
--name "iowa_order" \
--tools tools.json \
> my_order.json
Here, we are saving the order request into a file called my_order.json, which we will use to create the order.
2. Create an order
$ planet orders create my_order.json

{"_links": {"_self": "https://api.planet.com/compute/ops/orders/v2/1e4ade86-20dd-45bc-a3cf-4e6f378b5774"}, "created_on": "2022-11-30T19:08:34.193Z", "error_hints": [], "id": "1e4ade86-20dd-45bc-a3cf-4e6f378b5774", "last_message": "Preparing order", "last_modified": "2022-11-30T19:08:34.193Z", "metadata": {"stac": {}}, "name": "iowa_order", "products": [{"item_ids": ["20200925_161029_69_2223", "20200925_161027_48_2223"], "item_type": "PSScene", "product_bundle": "analytic_sr_udm2"}], "state": "queued", "tools": [{"clip": {"aoi": {"coordinates": [[[-91.198465, 42.893071], [-91.121931, 42.893071], [-91.121931, 42.946205], [-91.198465, 42.946205], [-91.198465, 42.893071]]], "type": "Polygon"}}}, {"harmonize": {"target_sensor": "Sentinel-2"}}]}
Alternatively, we can combine steps 1 and 2 into a single command by harnessing the power of STDIN with the format <request command> | <create command> -.
$ planet orders request 20200925_161029_69_2223,20200925_161027_48_2223 --item-type psscene --bundle analytic_sr_udm2 --name "iowa_order" | planet orders create -
We can find the order ID in the response from the Orders API under the field called “id”. In this case, the order ID is “1e4ade86-20dd-45bc-a3cf-4e6f378b5774”
3. Report the state of the order
$ planet orders wait 1e4ade86-20dd-45bc-a3cf-4e6f378b5774
08:25 - order 1e4ade86-20dd-45bc-a3cf-4e6f378b5774 - state: running
If successful, the states will go from queued > running > success!
Results in GEE
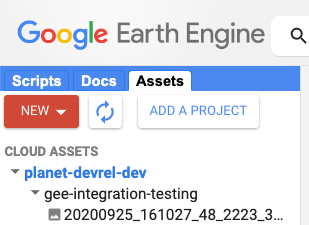
Now that you’ve delivered your data to GEE, here’s where you’ll find it. Head on over to your GEE console, https://code.earthengine.google.com/, click the “Assets” tab on the left hand side of the screen, and below you will find the Cloud Project you created under the tab called “CLOUD ASSETS”. Under the your Cloud Project name you will find your ImageCollection, and within you will find the images you requested.
Next steps
In this example, we relied on Planet's Google Service Account for data delivery. However, this Service Account is used by many users and may be subject to delays if it reaches its maximum delivery quota. To avoid this, you can create your own Service Account, which would provide you with a dedicated delivery queue and sooner access to your data. In a future blog post, we will discuss the benefits of using a custom Service Account and provide instructions on how to integrate it with your GEE project. Chat with us about any ideas or issues at https://community.planet.com/developers-55. Follow us on Twitter @planetdevs.
