Stream and Download Planet Basemaps Tools
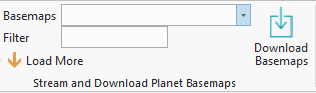
In this section of the ribbon, there is a Basemaps dropdown and Filter text box. The dropdown menu will list any Planet basemaps that your Planet account has access to. Users can narrow the search results using the Filter text box, and can paginate more results using the Load More arrow.
Next to the Basemaps Dropdown menu is the Download Basemaps tool. This tool allows users to draw an AOI and download the corresponding basemap quads that intersect the AOI.
Basemaps Dropdown
The Basemaps dropdown lists the basemaps your account has access to.
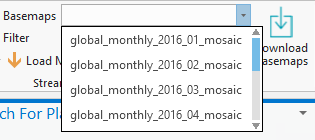
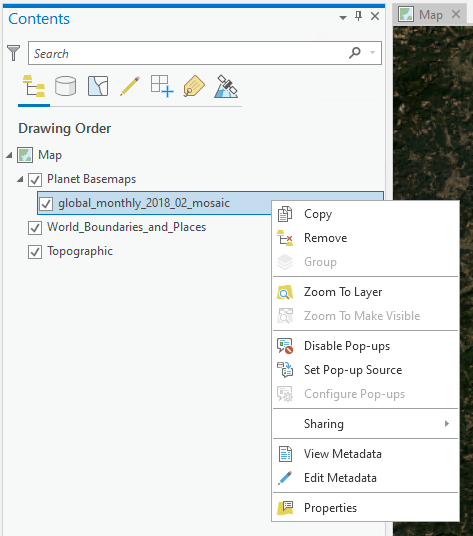
When you click on a basemap listed in the dropdown interface, that basemap layer is automatically added to your map view as a Web Map Tile Service (WMTS) and is available to toggle on/off in the ArcGIS Pro Contents tab under the layer title: Planet Basemaps. Once added to the Map View, the basemaps layer can be treated like any other WMTS layer (i.e. Properties, Zoom to layer, etc).
Filter Textbox
The basemaps dropdown can be filtered using the Filter box. For example, if you want imagery only from 2018, type "2018". The Filter box is text only and queries text in a basemap's title.
Load More Button
The Load More option below the Filter text box allows you to load 10 more basemaps each time you click it.
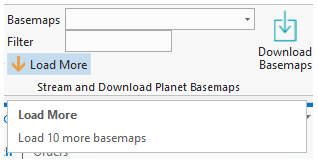
This button will respect the Filter options set above. However, if there are no more basemaps that satisfy the Filter criteria, no more will appear in the dropdown.
Download Basemaps Button
The Download Basemaps button allows users to download a basemap's source quads as TIF files. In order to download, a user must have sufficient download quota through their Planet subscription. You can check your download permissions here.
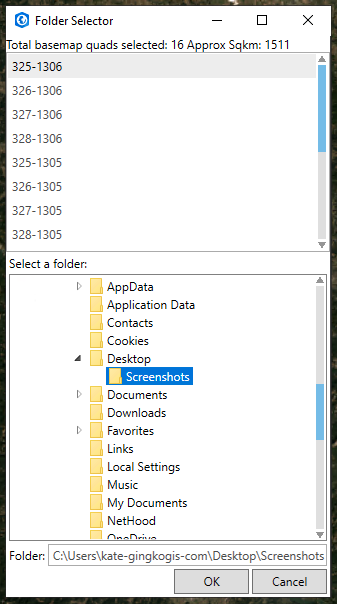
To download basemap quads, first the Planet Basemap layer must be selected in the Contents tab of the Map Viewer. Then use the Download Basemaps button to draw an AOI using the draw tools that appear at the bottom of your map-view. Once you complete the AOI, a search results panel will appear with a list of corresponding basemaps quads. The panel will also give a size estimate of the quads in Square Kilometers. Choose a location on your machine to download the source quads to.
- Note: If you have another layer selected, you will recieve an error stating "The selected layer is not a Planet Image layer".
Area of Interest (AOI) Toolbar

By default, the Line draw option is selected in the AOI toolbar. Other options for drawing an AOI are available in the AOI toolbar.
The default option is the Line. Next to the Line icon is the Right Angle Line button (default). You can choose either to create a right angle, or by clicking the small down arrow next to it, you can toggle to the Midpoint Line option (top icon below).
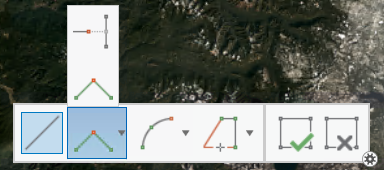
Streaming (F8):
- Turn on stream mode editing so vertices are placed at an interval as you move around the map. Click the map to stop streaming temporarily, then click again to start creating vertices.
At the far right of the AOI Toolbar, there are two buttons: Finish (F2) and Cancel (Ctrl + Del). Finish applies the changes you made and completes the operation. Cancel deletes the changes you made and cancels the operation.
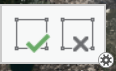
Once you have finalized the area of interest, you can either cancel or finish the Downloading Basemaps operation. When you click Finish, a popup window appears where you can choose the directory to save the downloaded basemap TIF files.
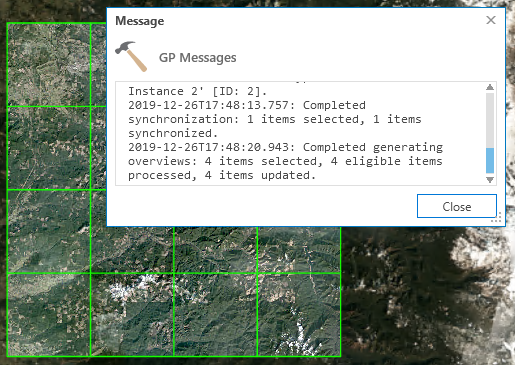
Once fully downloaded, the mosaic basemap imagery will be automatically added to your ArcGIS Pro project. Geoprocessing tasks will be done to synchronize the mosaic datasets, and a success window will popup at the end of the geoprocessing tasks.
You should have your mosaic layers available in the map view and in the Contents tab.
Rate this guide: